Free Post Processing UI V2.2 for VRChat Udon worlds
- ダウンロード商品¥ 0無料ダウンロードPost_Processing_UI_v2.2-1.rar(3.84 MB)Post_Processing_UI_v2.2-1.rar
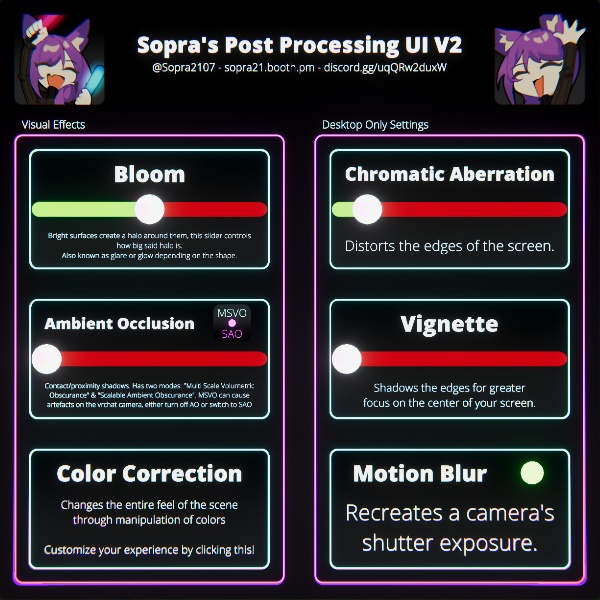
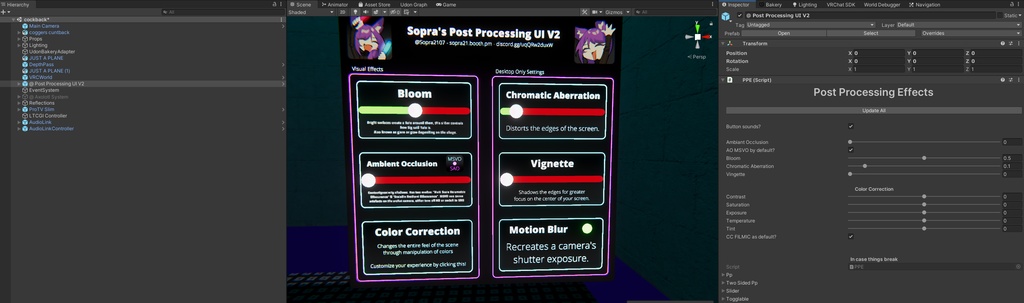
Few updates: - Added a motion blur toggle to the editor script (i forgot... sorry ;-;) - UI now turns on based on player distance instead of a collider. While this is slightly slower, it works more consistently & doesn't stop users from interacting with the UI How to use & Setup: https://youtu.be/-87iZxOl_Qs Need more help? Join the discord! https://discord.gg/uqQRw2duxW Written instructions: Make sure that before you've imported this, you had the latest VRCSDK, U# & the post processing package in your project! Once the package is imported inside your project, a new folder called "_Sopra's Toybox" should appear. Inside the "Post Processing" folder are 2 prefabs: - The post processing UI - A "Main Camera" If you've already setup a main camera, the one in this folder won't be of much use. Although if you don't, drag and drop it in your scene's hierarchy, then in your "VRCWorld" object, drag and drop it in the "Reference Camera" slot. To setup the prefab itself, drop it in your hierarchy. If the canvas is empty, it means TextMesh Pro isn't present yet. No fear, a window should pop up asking to install it, press "Import essentials". If you closed this window, you should be able to find said window in your Project settings. Once TMP has imported, simply delete the prefab from the hierarchy, then drag it in once again. This should fix the broken text. To change the position of the UI, move around it's root called "@ Post Processing UI V2" and nothing else. The UI is quite a performance hog when open, so it relies on the player being close to it. By moving the canvas itself you can break this functionality. If you want to change the default values, I have provided an editor script that allows you to do so easily instead of needing to go through all objects. YOU MUST UNPACK THE PREFAB WHEN USING IT. When clicking on "@ Post Processing UI V2" your inspector should show all the sliders and toggles you'll need. Once you've dialed in your settings, press the "Update All" button at the top. Features - Fairly easy & straight forward setup - Editor script to change default values - Allows players to edit 100% of their visual experience. - Neon Aesthetic & funny synth sound buttons -Features that are unavailable in VR are only available for desktop players. These automatically get disabled if VR is detected. art by ghosty! https://twitter.com/tama_desuwu www.DeepL.com/Translator(無料版)で翻訳しました。 指示書です。 これをインポートする前に、プロジェクトに最新のVRCSDK、U#、ポストプロセッシングパッケージがあることを確認してください。 プロジェクト内にパッケージがインポートされると、「_Sopra's Toybox」という新しいフォルダが表示されるはずです。 Post Processing」フォルダの中には、2つのプレハブがあります。 - ポストプロセッサのUI - A "メインカメラ" すでにメインカメラをセットアップしている場合は、このフォルダの中のものはあまり意味がありません。しかし、そうでない場合は、シーンの階層にドラッグ&ドロップし、「VRCWorld」オブジェクトの「Reference Camera」スロットにドラッグ&ドロップしてください。 プレハブを設定するには、プレハブを階層にドロップします。 キャンバスが空の場合、TextMesh Proがまだ存在しないことを意味します。インストールを促すウィンドウが表示されるので、「Import essentials」を押してください。このウィンドウを閉じた場合は、プロジェクト設定でこのウィンドウを見つけることができるはずです。 TMPがインポートされたら、プレハブを階層から削除し、もう一度ドラッグしてください。これで、文字化けが直るはずです。 UIの位置を変更するには、「@ Post Processing UI V2」というルート周辺を移動して、それ以外は何もしないでください。UIを開くと、かなりパフォーマンスを低下させるので、プレイヤーがUIの近くにいる必要があります。キャンバス自体を移動させると、この機能を停止させることができます。 デフォルト値を変更したい場合は、すべてのオブジェクトを参照する代わりに、簡単に変更できるエディタスクリプトを用意しました。@ Post Processing UI V2」をクリックすると、インスペクタに必要なすべてのスライダとトグルが表示されるはずです。設定が完了したら、上部にある「Update All」ボタンを押してください。 特徴 - 非常に簡単でわかりやすい設定 - デフォルト値を変更するためのエディタースクリプト - プレイヤーが100%視覚体験を編集できるようにする。 - ネオンアエステティック&ファニーシンセのサウンドボタン -VRで使用できない機能は、デスクトッププレイヤーでのみ使用可能です。VRが検出されると、これらは自動的に無効になります。